
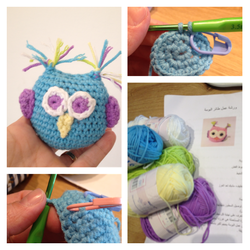
One of the most difficult but fun things to crochet are toys - known as amigurumi. They are small and every single stitch counts so mistakes show easily and can really throw the project off. This baby owl, however, is really super easy and doesn't take too long to make.
If you have tried amigurumi before and given up, I'd say this will change your mind. It's really easy to make and only takes about two to three hours (for a beginner).
Very important to note that you should use a stitch counter to mark each round so that you don't lose the count. I used Excel yarn and a size 4 hook. The smaller the hook, the tighter the stitches and the less the fiberfill will show through.
Pattern (Thank you for sharing Muna)
Start with a magic circle.
Round 1: 1 Ch, 6 sc
Round 2: 1sc, 3 sc in the next stitch, 3 sc in the next stitch, repeat. (1,3,3,1,3,3). Total 14 stitches.
Round 3: 1 sc, 1 sc, 1 sc, 3 sc in the next stitch, 3 sc in next stitch, 1 sc, 1 sc, 1 sc, 1 sc, 3 sc in next stitch, 3 sc in next stitch, 2 sc. Total 22 stitches.
Round 4: 1 sc, 1sc, 1 sc, 1 sc, 2 sc in next stitch, 2 sc in next stitch, 2 sc in next stitch, 1 sc, 1 sc, 1sc, 1sc, 1sc, 1sc, 1sc, 1sc, 2 sc in next stitch, 2 sc in next stitch, 2 sc in next stitch, 1 sc, 1 sc, 1sc, 1sc. Total 28 stitches.
Round 5: 1sc, 1sc, 1sc, 1sc, 1sc, 1sc, 2 sc in next stitch, 2 sc in next stitch, 1 sc in each of the next 12 stitches, 2 sc in next stitch, 2 sc in next stitch, 1 sc in each of the next 6 stitches. Total 32 stitches.
Rounds 6-12: 1 sc in each stitch. Total 32 stitches.
Round 13: 1 sc in each of the next 10 stitches. 1 sc2tog (decrease), 1 sc in each of the next 14 stitches, 1 sc2tog (decrease) 1 sc, 1sc, 1sc, 1sc. Total of 30 stitches.
Round 14: 1 sc in each of the next 14 stitches, 1 sc2tog (decrease), 1sc, 1sc, 1sc, 1sc, 1 sc2tog (decrease), 1sc in each of the next eight stitches. Total of 28 stitches.
Round 15: 1 sc in each of the next six stitches, 1 sc2tog (decrease), 1sc in each of the next 18 stitches, 1 sc2tog (decrease). Total of 26 stitches.
Round 16: 1 sc, 1 sc, 1 sc2tog (decrease), 1 sc in each of the next nine stitches. Total of 24 stitches.
Round 17: 1 sc, 1 sc2tog (decrease), 1 sc in each of the next eight stitches, 1 sc2tog (decrease), 1 sc, 1 sc, 1 sc, 1 sc2tog (decrease), 1 sc in each of the next six stitches. Total 21 stitches.
Round 18: 1 sc, 1 sc2tog (decrease) 1 sc in each of the next four stitches. End with slip stitch.
Leave a long tail of yarn to use to sew the owl closed. You will need fiber fill (you can find it at any of the crafting or yarn shops in Kuwait ) to fill up the owl. Once you have it full, sew the owl's top together with the points at the edges.
Eyes
Using white yarn, crochet 5 ch, slip stitch to join and then double crochet 12 stitches around. I used safety eyes in the middle but you can crochet a small colored circle using a magic circle to fit inside the white. Leave a long tail to use for sewing the eyes onto the body of the owl. You may also want to use a stitch marker to hold the eyes in place on the body as you sew them on to keep them even and in place.
Wings
Using a different colored yarn, start with a magic circle.
Round 2: 12 dc, join with slip stitch and tie off. You can pinch the sides of the owl as you sew on the wings to help them stand out more. Leave a long tail to use for sewing onto the sides.
Nose
Using another colored yarn or the same as the wings, single crochet three, turn and 2sctog (decrease) and then turn and one 2sctog (decrease) and tie off. Leave a long tail to use for sewing on the sides.
Hair
Cut about 2 inch lengths of different colored yarns, pull through the pointed edge of the baby owl at the top and then tie in a knot. I mixed in several colors yarn to get a nice look.
Abbreviations
Ch - Chain
SC - Single Crochet
DC - Double Crochet
2sctog - Decrease
 RSS Feed
